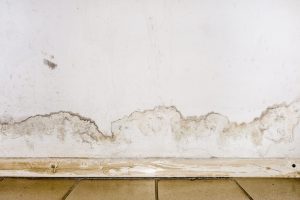
How to Repair Water-Damaged Drywall

Sugar Land Mold Remediation - water damaged drywallWater damage is a common problem for homeowners, and when it affects drywall, quick action is required. Whether it comes from a leaky pipe, a roof leak, or flooding, water damage can weaken the structure of drywall and make it a good place for mold and mildew to grow. In this article, we'll discuss how to thoroughly and successfully repair drywall that has water damage.

Assessing the Damage

Finding out how serious the issue is is the first step in fixing water-damaged drywall. Look for things like stains, sagging, or a soft, spongy feel. These signs can help you figure out what needs to be fixed right away. Use a moisture meter to find out how much water is in the drywall. This will help you figure out how bad the damage is.

Preparation

It's important to have everything you'll need on hand before beginning the repair process. You'll need a utility knife, a drywall saw, a putty knife, sandpaper, joint compound, drywall patches, screws, a drill, and a paintbrush. Also, make sure you have the right safety gear, like gloves, goggles, and a dust mask, to keep yourself safe.

Removing Damaged Drywall Sections

To fix water-damaged drywall, you have to take out the damaged areas. Cut out the damaged pieces along the edges of the studs with a utility knife or drywall saw. Be careful not to damage any nearby drywall that is still in good shape. Once the damaged pieces are removed, dispose of them properly.

Drying

After taking out the damaged drywall, it's important to dry the area well to stop mold from growing. Use fans and dehumidifiers to move the air around and speed up the drying process.

Repairing the Drywall

With the damaged sections removed and the area dry, it's time to repair the drywall. Measure the size of the openings and cut corresponding drywall patches to fit snugly into the gaps. Secure the patches in place using screws or drywall adhesive, ensuring they are flush with the surrounding drywall. Once the patches are in place, apply joint compound over the seams, feathering it out to create a smooth transition between the old and new drywall.

Finishing Touches

To achieve a seamless repair, sand the patched areas using sandpaper to smooth out any unevenness. Wipe away the dust with a damp cloth and apply a primer to the repaired sections before painting. Once the primer is dry, apply a coat of paint that matches the surrounding wall color to further blend the repaired area with the rest of the wall. Let the paint dry completely before you judge how it turned out.

Conclusion

Repairing drywall that has been damaged by water is a job that needs attention to detail and good execution. By following the steps in this article, you can effectively fix your walls and make them look nice again. However, it's important to note that in some cases, water damage may be extensive or accompanied by structural issues. When this happens, it's best to get help from a professional to make sure the damage is completely fixed.

Remember, prevention is always better than cure. Fix any leaks or plumbing problems in your home right away to prevent water damage to your drywall in the future. Check your roof and gutters regularly for signs of damage or clogs. Maintaining a dry environment and taking care of water problems quickly will help keep your drywall in good shape and prevent damage.

Discover effective ways to keep your home or office moisture-free and get rid of mold with Pure Maintenance of Texas. Contact us today!



How to Keep AC Drain Lines Clear

condensation drain has become plugged and must be cleaned - Sugar Land Mold Remediation


You rely on your air conditioning system during the hot summer to keep your home comfortable. However, a clogged AC drain line can lead to various problems, including water damage, mold growth, and reduced AC performance. Fortunately, there are several steps you can take to keep your AC drain lines clear and functioning properly.

What is an AC drain line?

Let's quickly go over what it is and what it does before talking about how to keep your AC drain line clear. The AC drain line is a small pipe that runs from your air conditioner's evaporator coil to the outside of your home. Its purpose is to remove condensation that forms on the coil during the cooling process. Without a functioning drain line, this moisture would build up and eventually cause water damage or other problems.

Why do AC drain lines get clogged?

AC drain lines can become clogged for a variety of reasons, including:

  • Dirt and debris buildup: Over time, dirt, dust, and other debris can accumulate in the drain line, causing clogs.
  • Algae and mold growth: The dark, damp environment inside the drain line can be a breeding ground for algae and mold, which can quickly clog the line.
  • Poor installation: If the drain line is not installed properly, it may be more prone to clogging.
  • How to Keep Your AC Drain Line Clear

Now that we know why AC drain lines get clogged, let's discuss some steps you can take to prevent clogs and keep your drain line clear.

Change Your Air Filter Regularly

One of the simplest and most effective ways to prevent AC drain line clogs is to change your air filter regularly. A dirty air filter can reduce airflow and increase moisture buildup, contributing to drain line clogs. Aim to change your air filter every 1–3 months, depending on your usage and type of filter.

Clean the AC Drain Lines

Cleaning the AC drain line is another important step in preventing clogs. To do this, locate the drain line outside your home (it will be a PVC pipe near your outdoor unit) and gently flush it out with water. You can use a garden hose or a special attachment designed for this purpose. Be careful not to use too much pressure, which could damage the line. If you notice any visible clogs, you may need to use a pipe cleaner or call in a professional to clear the line.

Use Algaecide Tablets

As we mentioned earlier, algae and mold growth can quickly clog an AC drain line. To prevent this, you can use algaecide tablets, which are small tablets that dissolve slowly and release chemicals that prevent algae and mold growth. Simply drop one or two tablets into the drain pan monthly during the cooling season.

FAQs

Q: How do I know if my AC drain line is clogged?

A: Some signs of a clogged AC drain line include water leaking from your indoor unit, musty odors, and reduced AC performance. If you see any of these signs, you should check your drain line and clean it if necessary.

Q: Can I use vinegar or bleach to clean my AC drain line?

A: While vinegar or bleach can effectively kill mold and algae, they can also harm your AC drain line if used improperly. Vinegar and bleach are both acidic and using too much of either substance or leaving it in the drain line for too long can damage the PVC material of the line for use in AC drain lines. Instead, we suggest using an algaecide product that is made to be used in air conditioner drain lines.

Q: Do I need a professional to clean my AC drain line?

A: In most cases, you can clean your AC drain line yourself using the steps we outlined above. However, if you're uncomfortable doing so or notice any major clogs or other issues, it's best to call a professional HVAC technician to inspect and repair your system.

Q: How often should I clean my AC drain line?

A: We recommend cleaning your AC drain line at least once per year, ideally before the start of the cooling season. However, if you live in a particularly humid or dusty area, you may need to clean it more often.

Q: Can a clogged AC drain line cause other problems besides water damage?

A: Yes, a clogged AC drain line can lead to reduced AC performance, as well as increased energy bills and mold growth. It can also create an environment for insects and other pests to thrive.

In conclusion, keeping your AC drain line clear is important to maintaining your air conditioning system and preventing water damage and other issues. By following these simple steps and being mindful of signs of a clogged drain line, you can keep your home cool and comfortable all summer long.

Prevent water damage and mold in your home with a clear AC drain line! Reach out to Pure Maintenance of Texas for the expertise you need.

What is Black Mold?

What is Black Mold?

Black mold is a type of fungus that can be dangerous to human and animal health. It typically grows in damp, humid areas like bathrooms and basements. In this article, we'll explore what black mold is, how it forms, and what you can do to prevent it, drawing from expert sources.

What exactly is black mold?

Black mold is a term used to describe a group of molds that appear black or dark in color. While some strains of black mold produce toxins that can be harmful, not all black molds are toxic, according to the Centers for Disease Control and Prevention (CDC).

What causes black mold?

Black mold thrives in damp, humid conditions. Poor ventilation, water damage, and high humidity levels can all create the perfect environment for mold growth. Mold can grow on organic materials like wood, paper, and fabric, especially when they are exposed to moisture for extended periods.

According to the Environmental Protection Agency (EPA), the following are some of the most common causes of indoor mold growth:

  • Water leaks or flooding
  • High humidity levels
  • Inadequate ventilation
  • HVAC system problems

What are the symptoms of black mold exposure?

Exposure to black mold can cause a range of health symptoms. These can include respiratory problems, allergies, skin irritation, headaches, dizziness, fatigue, and weakness. In severe cases, exposure to black mold can lead to neurological issues and even death.

What species of mold are commonly referred to as black mold?

While Stachybotrys chartarum is one of the most commonly associated species of mold with a dark or black appearance, according to the American Academy of Allergy, Asthma & Immunology (AAAAI), not all strains of this mold produce toxins, and the health risks associated with exposure to these toxins are not well understood.

How can you prevent black mold?

Preventing mold growth is important for protecting your health and property. The EPA recommends taking the following steps to prevent mold growth:

  • Fixing leaks or water damage promptly
  • Adequately ventilating areas with high humidity
  • Using dehumidifiers to reduce moisture levels
  • Regularly cleaning and maintaining your HVAC system
  • Removing any mold growth immediately

What should you do if you suspect black mold?

If you suspect black mold growth in your home or property, it's important to act quickly. The CDC recommends hiring a professional mold inspector to test for mold and identify the type of mold present. If you discover mold growth, the EPA recommends removing it immediately using appropriate personal protective equipment and following proper cleaning procedures.

In conclusion, black mold can pose serious health risks, so it's important to be vigilant in preventing and dealing with mold growth. By understanding what causes mold growth, how to prevent it, and what to do if you suspect black mold, you can protect your health and property from this dangerous fungus.

Get the knowledge and help you need to address black mold concerns. Pure Maintenance of Texas is here to provide expert advice and remediation services - contact us today!

Do I Need to Replace Wet Drywall?

Flooding rainwater or floor heating systems, causing damage, peeling paint and mildew - Do I need to replace wet drywall?

If you recently had a water leak in your home, you may wonder if the wet drywall needs replacing. It’s essential to understand when it’s necessary and when it’s safe to dry out the wall and move on. 

Let's look at some of the considerations you should consider when deciding whether to replace wet drywall.

When is Replacement Necessary?

The initial step is to inspect and evaluate any resulting damage to assess the full impact of a water leak. If it was only minor, you could get away with drying out the drywall and not needing a replacement. 

However, if there are large amounts of water or any visible mold, then replacing wet drywall would be your best option for ensuring that your family remains safe from any potential health risks posed by mildew or mold.

Additionally, suppose your walls have been exposed to excessive moisture for an extended period of time. In that case, they may have lost their structural integrity and must be replaced regardless of any visible mold or mildew.

What To Do Before Replacing Wet Drywall?

If you do decide that it’s necessary to replace wet drywall, you must take some preliminary steps before doing so. 

First, ensure all standing water has been thoroughly removed from inside and outside the wall cavity (if applicable). Then use fans or dehumidifiers to ensure that all moisture has been completely eliminated from the area before beginning work on replacing the damaged pieces of drywall. 

You should also ensure that any insulation between wall cavities has been adequately dried. If left wet for too long, this can become a breeding ground for mold and other harmful bacteria. 

Finally, consider having a professional team inspect your walls for any additional damage — such as water-related damage done to electrical wiring — before replacing wet drywall to avoid any potential hazards down the line.

As we have seen, replacing wet drywall can prevent further damage caused by water leaks and reduce potential health risks associated with mold growth due to prolonged exposure to moisture. 

However, before returning any wall material, ensure that all standing water has been removed and proper drying procedures have been taken to ensure safety. 

Conclusion

Whether you choose to replace wet drywall yourself or hire a professional depends mainly on how extensive the damage is – but either way, this task must be completed correctly to protect your family's health and ensure the maximum longevity of your home's walls!

Is your drywall water-damaged? Get the help you need now! Contact Pure Maintenance of Texas to start restoring and protecting your walls.


Water Damage Restoration: How to Prevent Mold Growth

Water Damage Restoration: How to Prevent Mold Growth

After water damage, the single most important thing you can do to prevent mold is dry everything out fast, ideally within 24 to 48 hours. Mold is a moisture problem at heart, and a wet house is exactly what it's waiting for.

On the Gulf Coast, where humidity and flooding are part of life, a quick response makes all the difference. Here's how water damage turns into a mold problem, and the practical steps that keep it from taking hold.

How Water Damage Leads to Mold

Water damage leads to mold because mold needs moisture to grow, and soaked materials give it exactly that. Mold spores are already in every home, floating in the air and harmless, until they settle onto something wet and start feeding.

That's why speed matters. Mold can begin growing within 24 to 48 hours of a surface staying wet. Dry things out inside that window and you often stop a mold problem before it starts. Miss it, and what began as a water issue quietly becomes a mold issue.

The 24 to 48 Hour Window

First 24–48 hours
Your window to dry everything out
After 48 hours
Mold can begin to grow

Dry everything out within 24 to 48 hours, and you often stop mold before it starts.

The Signs to Watch For

Even after the water's gone, keep an eye out for the signs that mold may have taken hold: a musty, earthy smell, visible spots or discoloration, water stains on walls or ceilings, or paint that's warping or bubbling. Any one of them is reason enough for a closer look.

What to Do First

Start by drying the space as quickly and completely as you can. Get standing water out, run fans and a dehumidifier, open windows if the outside air is dry, and pull up soaked materials like wet carpet or padding that won't dry in time.

For a small area from clean water, this is often something you can handle yourself. But some situations call for a professional: a large affected area, water that may have been contaminated from a sewage backup or storm flooding, or damage that's worked its way into walls and structure. For big water events, traditional remediation is usually the right call, and a licensed remediation contractor is who you want. And if you're ever unsure whether mold is present, a licensed assessor can test and confirm it.

How to Prevent Mold After Water Damage

Preventing mold after water damage comes down to removing the moisture before it has time to work. A few steps that help:

  • Get standing water out as fast as possible.
  • Dry the area completely with fans and a dehumidifier, not just until it looks dry.
  • Open windows and doors for airflow when the outside air is dry.
  • Take out wet materials that can't fully dry, like soaked carpet, padding, or drywall.
  • Keep checking the area for the next couple of weeks for any musty smell or new discoloration.
The goal is simple: no lingering moisture, no mold.

Where Pure Maintenance of Texas Fits In

Once the water's handled and any heavy work is done, our patented VaPURE dry fog process addresses the air itself, reaching spaces cloths and sprays can't and helping restore your indoor air to a healthier condition. Sometimes that's the finishing step after a water event. And sometimes, if the problem was small and you caught it early, you won't need us at all. Either way, we'll give you an honest answer.

Frequently Asked Questions

Can I clean up mold myself after water damage?

For a small area on a hard surface from clean water, often yes. Protect yourself with an N95 mask, gloves, and eye protection, clean with detergent and water, dry it completely, and fix the moisture source. For larger areas, water that may have been contaminated, or mold in walls or your HVAC, it's better to bring in a professional.

Is all mold dangerous?

No. According to the CDC, being around mold may cause health effects for some people and none at all for others. People with allergies, asthma, or weakened immune systems tend to be more sensitive. If you're worried about symptoms, your physician is the right person to ask.

How long does it take for mold to grow after water damage?

Mold can begin growing within about 24 to 48 hours of a surface staying wet, which is why drying things out quickly matters so much.

Dealing with water damage or a musty smell that won't quit? Give us a call. We'll talk it through, and if you don't need us, we'll say so.

Schedule an Evaluation

The Importance of Grading Your Landscaping

rocks around home exterior for drainageLandscaping is a great way to beautify your home and create a cozy outdoor living space. But did you know that the way you grade your landscaping can have a significant impact on the health of your home?

Grading refers to how the ground slopes around your home, and it's essential to ensure that the grading slopes away from your home to prevent moisture or water intrusion, which can lead to water damage and mold issues.

Why Grading is Important

Even a trickle of water can lead to big problems. For example, if your home is on a grade, rain tends to accumulate against the foundation - seeping into cracks and posing serious property damage risks. Fortunately, grading your landscaping away from your house will expertly redirect moisture away from its base, preventing any issues.

Grading your landscaping isn't just about preventing water damage, either. It can also help to prevent erosion and improve the overall health of your landscaping.

How to Tell if Your Landscaping Needs to be Re-graded

How do you grade your landscaping? The first step is to assess the slope of your landscaping. Next, walk around the perimeter of your home and look for areas where the ground slopes towards your home. These areas need to be re-graded to slope away from your home.

How to Re-grade Your Landscaping

You can re-grade your landscaping by adding soil to the areas that need sloped away from your home. First, use a shovel or rake to spread the soil evenly, then use a level to ensure the ground is tilted away from your home. Next, add more soil in some areas to create the proper slope.

If you're uncomfortable re-grading your landscaping, you can hire a professional landscaper to do it for you. They'll have the tools and expertise to ensure your landscaping is properly sloped away from your home.

Other Steps to Prevent Water Damage and Mold Issues

  • Clean and maintain your gutters to ensure proper water drainage.
  • Seal any cracks in your foundation to prevent water intrusion.
  • Properly waterproof your basement or crawl space.
  • Address any water leaks or plumbing issues as soon as they arise.

In conclusion, grading your landscaping away from your home is essential in preventing water damage and mold issues. You can keep your home healthy and prevent costly repairs by redirecting water away from your foundation. Plus, it can help to improve your landscaping and to avoid erosion.

Take a walk around your home and assess your landscaping. If you notice areas where the ground is sloped towards your home, it's time to re-grade your landscaping.

Investing in your home's landscaping could protect it from water damage, mold issues, and more. To understand how grading will equip you with that protection - contact Pure Maintenance of Texas today!