Do I Need to Replace Wet Drywall?

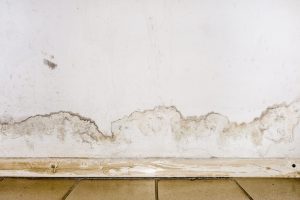
Flooding rainwater or floor heating systems, causing damage, peeling paint and mildew - Do I need to replace wet drywall?

If you recently had a water leak in your home, you may wonder if the wet drywall needs replacing. It’s essential to understand when it’s necessary and when it’s safe to dry out the wall and move on. 

Let's look at some of the considerations you should consider when deciding whether to replace wet drywall.

When is Replacement Necessary?

The initial step is to inspect and evaluate any resulting damage to assess the full impact of a water leak. If it was only minor, you could get away with drying out the drywall and not needing a replacement. 

However, if there are large amounts of water or any visible mold, then replacing wet drywall would be your best option for ensuring that your family remains safe from any potential health risks posed by mildew or mold.

Additionally, suppose your walls have been exposed to excessive moisture for an extended period of time. In that case, they may have lost their structural integrity and must be replaced regardless of any visible mold or mildew.

What To Do Before Replacing Wet Drywall?

If you do decide that it’s necessary to replace wet drywall, you must take some preliminary steps before doing so. 

First, ensure all standing water has been thoroughly removed from inside and outside the wall cavity (if applicable). Then use fans or dehumidifiers to ensure that all moisture has been completely eliminated from the area before beginning work on replacing the damaged pieces of drywall. 

You should also ensure that any insulation between wall cavities has been adequately dried. If left wet for too long, this can become a breeding ground for mold and other harmful bacteria. 

Finally, consider having a professional team inspect your walls for any additional damage — such as water-related damage done to electrical wiring — before replacing wet drywall to avoid any potential hazards down the line.

As we have seen, replacing wet drywall can prevent further damage caused by water leaks and reduce potential health risks associated with mold growth due to prolonged exposure to moisture. 

However, before returning any wall material, ensure that all standing water has been removed and proper drying procedures have been taken to ensure safety. 

Conclusion

Whether you choose to replace wet drywall yourself or hire a professional depends mainly on how extensive the damage is – but either way, this task must be completed correctly to protect your family's health and ensure the maximum longevity of your home's walls!

Is your drywall water-damaged? Get the help you need now! Contact Pure Maintenance of Texas to start restoring and protecting your walls.


Water Damage Restoration: How to Prevent Mold Growth

Water Damage Restoration: How to Prevent Mold Growth

After water damage, the single most important thing you can do to prevent mold is dry everything out fast, ideally within 24 to 48 hours. Mold is a moisture problem at heart, and a wet house is exactly what it's waiting for.

On the Gulf Coast, where humidity and flooding are part of life, a quick response makes all the difference. Here's how water damage turns into a mold problem, and the practical steps that keep it from taking hold.

How Water Damage Leads to Mold

Water damage leads to mold because mold needs moisture to grow, and soaked materials give it exactly that. Mold spores are already in every home, floating in the air and harmless, until they settle onto something wet and start feeding.

That's why speed matters. Mold can begin growing within 24 to 48 hours of a surface staying wet. Dry things out inside that window and you often stop a mold problem before it starts. Miss it, and what began as a water issue quietly becomes a mold issue.

The 24 to 48 Hour Window

First 24–48 hours
Your window to dry everything out
After 48 hours
Mold can begin to grow

Dry everything out within 24 to 48 hours, and you often stop mold before it starts.

The Signs to Watch For

Even after the water's gone, keep an eye out for the signs that mold may have taken hold: a musty, earthy smell, visible spots or discoloration, water stains on walls or ceilings, or paint that's warping or bubbling. Any one of them is reason enough for a closer look.

What to Do First

Start by drying the space as quickly and completely as you can. Get standing water out, run fans and a dehumidifier, open windows if the outside air is dry, and pull up soaked materials like wet carpet or padding that won't dry in time.

For a small area from clean water, this is often something you can handle yourself. But some situations call for a professional: a large affected area, water that may have been contaminated from a sewage backup or storm flooding, or damage that's worked its way into walls and structure. For big water events, traditional remediation is usually the right call, and a licensed remediation contractor is who you want. And if you're ever unsure whether mold is present, a licensed assessor can test and confirm it.

How to Prevent Mold After Water Damage

Preventing mold after water damage comes down to removing the moisture before it has time to work. A few steps that help:

  • Get standing water out as fast as possible.
  • Dry the area completely with fans and a dehumidifier, not just until it looks dry.
  • Open windows and doors for airflow when the outside air is dry.
  • Take out wet materials that can't fully dry, like soaked carpet, padding, or drywall.
  • Keep checking the area for the next couple of weeks for any musty smell or new discoloration.
The goal is simple: no lingering moisture, no mold.

Where Pure Maintenance of Texas Fits In

Once the water's handled and any heavy work is done, our patented VaPURE dry fog process addresses the air itself, reaching spaces cloths and sprays can't and helping restore your indoor air to a healthier condition. Sometimes that's the finishing step after a water event. And sometimes, if the problem was small and you caught it early, you won't need us at all. Either way, we'll give you an honest answer.

Frequently Asked Questions

Can I clean up mold myself after water damage?

For a small area on a hard surface from clean water, often yes. Protect yourself with an N95 mask, gloves, and eye protection, clean with detergent and water, dry it completely, and fix the moisture source. For larger areas, water that may have been contaminated, or mold in walls or your HVAC, it's better to bring in a professional.

Is all mold dangerous?

No. According to the CDC, being around mold may cause health effects for some people and none at all for others. People with allergies, asthma, or weakened immune systems tend to be more sensitive. If you're worried about symptoms, your physician is the right person to ask.

How long does it take for mold to grow after water damage?

Mold can begin growing within about 24 to 48 hours of a surface staying wet, which is why drying things out quickly matters so much.

Dealing with water damage or a musty smell that won't quit? Give us a call. We'll talk it through, and if you don't need us, we'll say so.

Schedule an Evaluation

How to Remove Mold with a Fogger: A DIY Guide

Professional Disinfector Character in Overalls Processing Damaged Walls with Sprayer from Mold. Removal of Black Fungus

Mold is a common problem that can be challenging to remove, especially in hard-to-reach areas. However, a mold removal fogger is one effective DIY method. This article will discuss everything you need to know about mold removal foggers, including how to use them, their benefits, types, and how to choose the right one for your DIY mold removal project.


What is a Mold Removal Fogger?

A mold removal fogger is a device that creates a fine mist of mold-killing solution. The fogger creates a cloud of mist that can reach every corner of the room, including areas that are difficult to reach with traditional cleaning methods.


How to Use a Mold Removal Fogger

Here are the steps to use a mold removal fogger for DIY mold removal:

Step 1: Prepare the room

  • Remove all furniture and belongings from the room.
  • Cover any electrical outlets, vents, and doorways with plastic sheeting.
  • Turn off the HVAC system to prevent the spreading of mold spores.

Step 2: Prepare the fogger

  • Fill the fogger with the recommended amount of solution.
  • Put on protective gear, such as gloves and a mask.

Step 3: Use the fogger

  • Turn on the fogger and point it toward the area you want to treat.
  • Move the fogger around the room to ensure every area is treated.
  • Leave the fogger running for the recommended amount of time.

Step 4: Clean up

  • Allow the mist to settle for a few hours before entering the room.
  • Remove the plastic sheeting and clean the fogger thoroughly to prevent clogging.


Benefits of Using a Mold Removal Fogger for DIY Mold Removal


Wood letters of DIY and definition on wood background


Using a fogger for DIY mold removal has several benefits, including:

  • Eliminates mold spores: A mold removal fogger can kill them, preventing them from spreading and causing further damage.
  • Reaches every corner: The fogger creates a cloud of mist that can reach every room corner, including areas that are difficult to get with traditional cleaning methods.
  • Fast and efficient: Using a fogger is quick and efficient, allowing you to treat a room in minutes.
  • Prevents future growth: The solution used in the fogger can prevent future mold growth, keeping your home mold-free for longer.


Types of Mold Removal Foggers for DIYers

There are several types of foggers for mold removal available for DIYers, including:

  • ULV foggers: ULV foggers create a fine mist of droplets less than 20 microns in size, making them ideal for treating large areas.
  • Thermal foggers: Thermal foggers use heat to vaporize a solution, creating a fog that can penetrate porous materials.
  • Cold foggers: Cold foggers use a high-pressure system to force a solution through a nozzle, creating a fine mist that can reach every room corner.


How to Choose the Right Fogger for DIY Mold Removal

When choosing a mold removal fogger for DIY, consider the following factors:

  • Size of the room: Choose an appropriate fogger for the space you need to treat.
  • Type of fogger: Consider the type that best suits your needs and budget.
  • The solution used: Choose a solution approved for mold removal and safe for your home and family.


Tips for DIY Mold Removal with a Mold Removal Fogger

Here are some tips to help you effectively remove mold with a fogger:

  • Wear protective gear, such as gloves, goggles, and a mask, when using the fogger.
  • Follow the manufacturer's instructions carefully to ensure safety and effectiveness.
  • Use a solution approved for mold removal and safe for your home and family.
  • Allow the mist to settle for a few hours before entering the room.
  • Clean the fogger thoroughly after each use to prevent clogging.


Frequently Asked Questions (FAQs) about DIY Mold Removal with a Fogger


Q: Is it safe to use a mold removal fogger for DIY mold removal?

A: It is safe to use a fogger for DIY mold removal if you follow the manufacturer's instructions carefully and use a solution approved for mold removal.

Q: How often should I use a mold removal fogger for DIY mold removal?

A: The frequency of use depends on the severity of the problem. If you have a severe mold problem, you may need to use the fogger multiple times. Otherwise, you can use it as a preventative measure once every few months.

Q: Can I use a mold removal fogger for DIY mold removal on my own?

A: Yes, you can use a fogger for DIY mold removal, but following the manufacturer's instructions carefully and wearing protective gear is essential.

Q: Do I need to vacate the room after using a mold removal fogger for DIY mold removal?

A: It is recommended to vacate the room for a few hours after using a fogger for DIY mold removal to allow the solution to settle and dry.

Conclusion

A mold removal fogger is an effective DIY method for removing mold and preventing future growth. When choosing a fogger, consider the type, the room size, and the solution used. Also, follow the manufacturer's instructions and wear protective gear when using the fogger.

If you're looking for a professional solution to your mold problem, contact Pure Maintenance of Texas today and learn about their exclusive two-step dry fog remediation process. Utilizing cutting-edge technology, it's the ideal way to eradicate mold without making any changes to your home or business environment!

10 Surprising Places Mold Might Be Hiding in Your Home

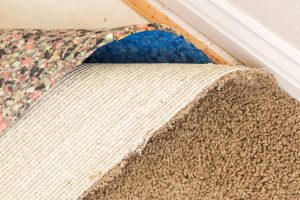
Pulled Back Carpet and Padding In Room of House.Believe it or not, mold can be more than an annoyance in dark attics and bathrooms. Mold might just pop up anywhere – even in the most surprising places!

So to save yourself some trouble next time you do your spring-cleaning routine, here are 10 potential problem spots to watch for unwanted growth.

On or Behind Wallpaper

Wallpaper provides the perfect environment for mold to grow—warm, moist, and usually out of direct sunlight. So if you have any old or peeling wallpaper in your home, it's worth checking for mold growth.

In or Under Carpets

Carpets are another prime spot for mold growth. If your carpets show signs of wear or have been wet, checking for mold is a good idea.

In Air Ducts

Air ducts are often humid and out of reach, making them the perfect place for mold to grow undetected. If you suspect mold in your air ducts, call a professional to have them checked out.

On Ceilings

Has discoloration or staining recently appeared on your ceiling? It could indicate a more significant problem, as porous ceilings - such as drywall - provide the perfect environment for mold growth when exposed to water. Investigate further if you notice any suspicious marks!

Underneath Kitchen Appliances

Kitchen appliances like refrigerators and dishwashers can leak, creating perfect mold conditions. Be sure to check underneath all of your major appliances at least once a year to ensure no hidden mold growth.

In Laundry Rooms

Laundry rooms are often damp and humid, which makes them ideal breeding grounds for mold spores. If you have a laundry room, watch for any signs of mold growth.

In Attics

It's important to remember that attics are an ideal environment for mold – often dark and humid, they provide an excellent opportunity for hidden growth. So check yours periodically to avoid any potential health risks associated with indoor mold infestation.

In Crawl Spaces

Crawl spaces are dark, humid places that are the perfect habitat for mold spores. If you have a crawl space in your home, check it periodically for signs of Mold growth.

On Windowsills 

Windowsills are often damp and out of direct sunlight, making them ideal spots for mold spores to take hold and grow into full-fledged colonies. So if you see any suspicious stains or discoloration on your windowsills, investigate further.

In Houseplants

Houseplants are often kept in humid environments (like bathrooms), which makes them susceptible to mold growth. Therefore, if you have any houseplants in your home, check them periodically for any signs of Mold growth."

Conclusion

Be aware of mold growth - pay close attention to your home's hidden areas, so you can tackle the problem before it can spread. Keeping an eye out for mold signs is critical when maintaining a healthy and safe living environment.

Preventing mold growth is essential to keeping your home healthy. Let the experts at Pure Maintenance of Texas provide you with quality inspection and prevention tips – contact them today!

The Importance of Grading Your Landscaping

rocks around home exterior for drainageLandscaping is a great way to beautify your home and create a cozy outdoor living space. But did you know that the way you grade your landscaping can have a significant impact on the health of your home?
Grading refers to how the ground slopes around your home, and it's essential to ensure that the grading slopes away from your home to prevent moisture or water intrusion, which can lead to water damage and mold issues.

Why Grading is Important

Even a trickle of water can lead to big problems. For example, if your home is on a grade, rain tends to accumulate against the foundation - seeping into cracks and posing serious property damage risks. Fortunately, grading your landscaping away from your house will expertly redirect moisture away from its base, preventing any issues.

Grading your landscaping isn't just about preventing water damage, either. It can also help to prevent erosion and improve the overall health of your landscaping.

How to Tell if Your Landscaping Needs to be Re-graded

How do you grade your landscaping? The first step is to assess the slope of your landscaping. Next, walk around the perimeter of your home and look for areas where the ground slopes towards your home. These areas need to be re-graded to slope away from your home.

How to Re-grade Your Landscaping

You can re-grade your landscaping by adding soil to the areas that need sloped away from your home. First, use a shovel or rake to spread the soil evenly, then use a level to ensure the ground is tilted away from your home. Next, add more soil in some areas to create the proper slope.

If you're uncomfortable re-grading your landscaping, you can hire a professional landscaper to do it for you. They'll have the tools and expertise to ensure your landscaping is properly sloped away from your home.

Other Steps to Prevent Water Damage and Mold Issues

  • Clean and maintain your gutters to ensure proper water drainage.
  • Seal any cracks in your foundation to prevent water intrusion.
  • Properly waterproof your basement or crawl space.
  • Address any water leaks or plumbing issues as soon as they arise.

In conclusion, grading your landscaping away from your home is essential in preventing water damage and mold issues. You can keep your home healthy and prevent costly repairs by redirecting water away from your foundation. Plus, it can help to improve your landscaping and to avoid erosion.

Take a walk around your home and assess your landscaping. If you notice areas where the ground is sloped towards your home, it's time to re-grade your landscaping.

Investing in your home's landscaping could protect it from water damage, mold issues, and more. To understand how grading will equip you with that protection - contact Pure Maintenance of Texas today!


Don’t Let Mold Contaminate Your Washing Machine

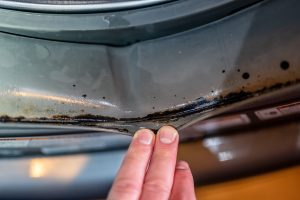
front loading washing machine with mold growing on door gasketFront-loading washing machines have become increasingly popular due to their energy efficiency, water savings, and gentle washing action. However, they develop mold contamination more easily than top-loading machines. Let’s explore the causes of mold in front-loading washing machines, the health risks associated with mold exposure, and ways to prevent mold growth.

Causes of Mold in Front-Loading Washing Machines

Mold can develop in front-loading washing machines due to their design, which creates a damp environment conducive to mold growth. Unlike top-loading machines, front-loading washing machines have a rubber seal around the door that can trap water and detergent residue, creating a moist and warm environment. In addition, the machine’s drum design holds water, which can contribute to mold growth.

Mold can also develop if the washing machine is not maintained correctly. Over time, dirt, soap residue, and fabric softener can build up in the machine, creating a breeding ground for mold. In addition, the combination of moisture and organic material provides an ideal environment for mold spores to grow and multiply.

Health Risks Associated with Mold Exposure

Mold can create more than an eyesore; it can potentially have a lasting health impact. Prolonged mold exposure may trigger allergic reactions, breathing difficulties, and infections. Individuals with allergies or asthma, young children, and the elderly may be more vulnerable to developing health issues.

Preventing Mold Growth in Front-Loading Washing Machines

You can take several steps to prevent mold growth in front-loading washing machines:

  1. Clean the machine regularly: Wipe down the door seal and drum after each use to remove any moisture or residue that may have accumulated.
  2. Use a suitable detergent: Use a high-efficiency (HE) detergent designed for front-loading machines to reduce soap residue buildup.
  3. Leave the door open: After each use, open the door to allow air to circulate and dry out the machine.
  4. Use a washing machine cleaner: Use a machine cleaner designed to remove mold, mildew, and soap residue from the machine.
  5. Consider using bleach: Run an empty cycle with bleach once a month to kill any mold or mildew that may be present.

Other Products on the Market to Help Prevent or Eliminate Mold

Some products can help prevent or eliminate mold in front-loading washing machines. Some of these include:

  1. Washing Machine Deodorizer and Cleaner: These products are designed to remove odor-causing bacteria and mold from the machine's drum and other parts. They can be used periodically to maintain a fresh and clean washing machine.
  2. Washer Fan: A washer fan is a small device that can be installed on the front-loading washing machine to improve air circulation and prevent mold growth. The fan circulates air through the machine to keep it dry and reduce moisture buildup.
  3. Washer Dryer Combo: This is an all-in-one unit that combines a washing machine and a dryer. They are designed to automatically dry the drum after each wash cycle, reducing the risk of mold growth.
  4. DIY Solutions: Several DIY solutions can help prevent mold in front-loading washing machines. For example, add a cup of white vinegar to the washing machine drum and run a hot water cycle to remove mold or mildew. Alternatively, add a tablespoon of baking soda to the detergent compartment to help neutralize odors.

To ensure the best results against mold in front-loading washing machines, it is vital to incorporate regular cleaning and maintenance alongside products specially formulated for this purpose.

In conclusion, while front-loading washing machines are energy-efficient and save water, they are also prone to mold contamination. Proper maintenance and regular cleaning can help prevent mold growth. Keep your family safe and healthy with a front-loading washing machine - following the suggested steps ensures you won't have to worry about mold contamination.

Is your front-loading washing machine leaving you with more than just clean clothes? Mold can lurk in all sorts of places, but Pure Maintenance of Texas is here to help! Ensure your home and family stay safe - contact us now to find out how we can keep mold from taking over.